Pinterest is by far one of the most useful tools out there for bloggers. It’s one of the best tools out there to grow your blog’s traffic and it’s also a great education tool, as well!
In order for Pinterest to be used as the great tool it is, you need to first craft the perfect Pinterest profile. Your profile is the foundation you build on. If you don’t have a firm foundation, your growth won’t be steady or large.
Today, I want to share some must-haves and tips on how to achieve the perfect Pinterest profile. While there are many things to check off your list here, it’s easier than you’d think!
[bctt tweet=”How To Craft The Perfect Pinterest Profile” username=”SummerTelban”]

HOW TO CRAFT THE PERFECT PINTEREST PROFILE:
1. Have A High-Quality Photo Of Yourself // When you’re developing your profile, always start by uploading a high-quality photo of yourself. No, not selfies. You need a professional photo. Don’t worry – if you’re not able to get a professional headshot done, simply use a self-timer on your phone for starters. Believe it or not, we pretty much all started there at one time! Just make sure the image is clear. You need a nice headshot or crisp image that captures clearly who you are.
I suggest uploading the same profile image that are on your other social media accounts and blog. This helps you to become more easily identifiable to your potential target audience.
2. Have Your Name & Title Clear // One thing that’s always confused me about some other bloggers and influencers are how some never have their names out there. There have been times I have literally had to hunt down some bloggers names, because it wasn’t even in there about me page. Friends, this isn’t okay! If you want to reach your target audience and build relationships with them, you’ve got to be up front about the basics. You need to have at least your first name listed, as well as your title (blogger, influencer, entrepreneur, etc.) in the name slot of your profile.
This helps to introduce yourself right away. The second someone clicks over to your profile, they’re able to learn your name and what you do without reading too in detail.
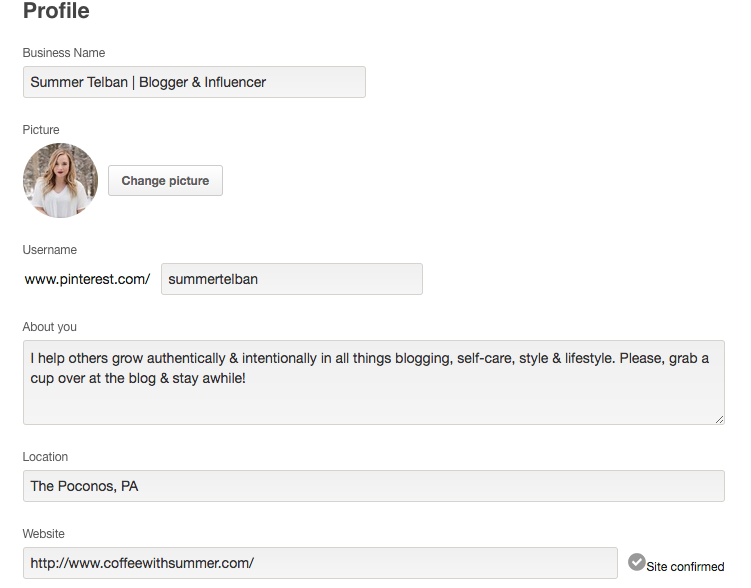
3. Write Your Bio & Add Your Location // For your Pinterest bio, you’re limited to only 160 characters, so it’s important that you play around and get creative with how you word what you do more in detail. For me, I did a quick, straight to the point summary of the main topics I cover through my blog. These topics are also spread out among all of the Pinterest boards I have. By summarizing what your blog and Pinterest account are focused on (which should be the same things), it’ll help to create consistency for your brand, which helps to grow your authority. I highly recommend adding a CTA (call-to-action) at the end of your bio, as this encouragers visitors to click over to your site to learn more.
[bctt tweet=”Always remember to include a CTA in your social media bios!” username=”SummerTelban”]
I love that Pinterest provides a place for you to include your location. When you’re able to identify with where someone lives, it can help grow connections even more. Most people put their closest metro city or the general area that they live in.
4. Add Your Blog Or Website // This should be a no-brainer! If you want to draw others to your blog, website, or shop, you need to have a link to it right in the website slot of your Pinterest profile.
5. Have A Business Account // If you haven’t already, make sure you switch your Pinterest account over to a business account. Don’t worry, it doesn’t cost a cent. By switching to a business profile, you’re able to get access to Pinterest Analytics and Ads. This is HUGE if you’re a blogger or any kind of entrepreneur. In Pinterest Analytics, you can see the amount of engagement your profile gets daily, how many people your entire profile reaches, and you can see any activity from your site associated on Pinterest. It’s awesome, but you can only access these perks with a business account.
[bctt tweet=”7 Things To Max Out Your Pinterest Profile For Success” username=”SummerTelban”]
6. Apply For Rich Pins // Rich pins was one of Pinterest’s best genius ideas ever. What are rich pins? Rich pins refer to Pinterest pins that have your website name and icon displayed underneath the pin image. This helps to easily direct users right to the source! Having rich pins also helps to elevate your presence, which only grows your authority online. By having rich pins, you become all the more recognizable all over Pinterest, because you’re able to standout from the rest.
For more information, click here. To learn the easiest way to set rich pins up if you’re on WordPress, check out this article by Melyssa Griffin.
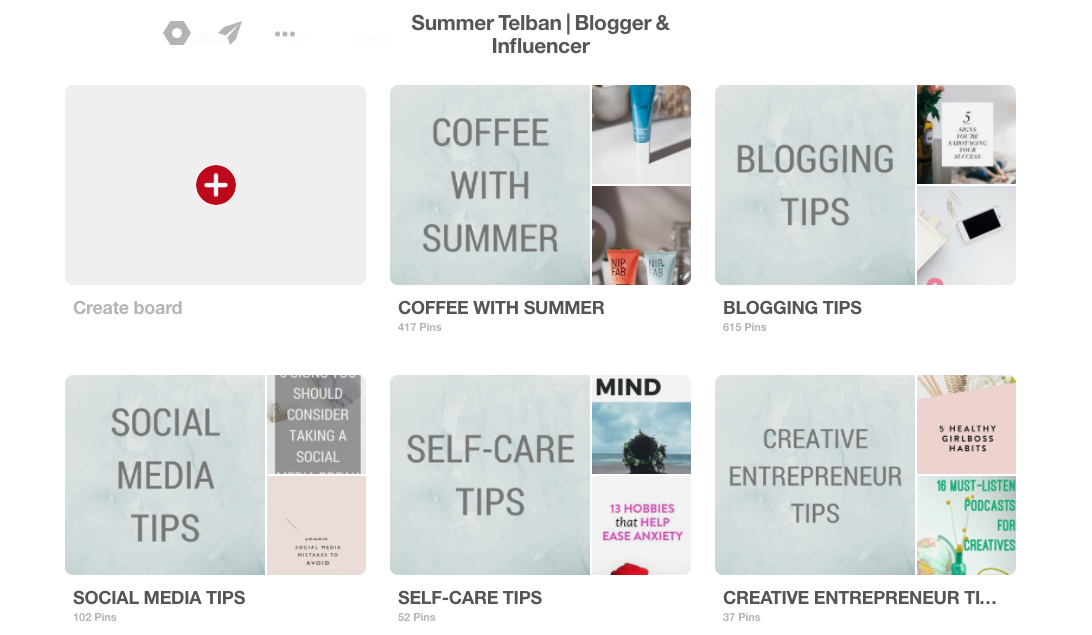
7. Create Cohesive Pinterest Board Cover Images // Back in January, I wrote up and entire post on how to customize your own Pinterest board cover images to help better establish your brand. Ever since starting to brand my cover images over a year ago, I noticed my profile pick up. Having cohesive board images helps to make your profile look neat and organized. It also helps your target audience easily find what they’re looking for. I think that by branding your board cover images with a simple background and simply the title of the board, you can make your profile stand out SO much more from others. Plus, it helps to bring more consistency to your overall brand.
To learn how to EASILY create your own board cover images, check out my post here: How To Create Branded Pinterest Board Cover Images.
[bctt tweet=”Cohesiveness is KEY to building a brand that’s recognizable and full of authority.” username=”SummerTelban”]
UPDATE: Pinterest now lets you put Pinterest boards into sections. If you’re a blogger this works best for your blog’s Pinterest board. Instead of having all of your posts scattered in a board, set up sections by the TOPIC of the pin. To learn more about the process, see my blog post here on How to Utilize Pinterest Board Sections.
8. Relevant & Searchable Board Titles // When I first got a Pinterest account before I started blogging seriously, all of my board titles were crazy, haha. Instead of simply having a board titled “Style” it’d be titled something random like, “Lovely Threads”. The issue with boards titled this way is they’re not searchable. The best thing you could do when titling your Pinterest boards is to just be straight to the point. For example, above you can see what some of my boards are titled – “Blogging Tips”, “Social Media Tips”, “Self-Care Tips”, and so on. You don’t want to create confusion. you want your target audience to quickly pick up what each board is about.
9. Create Vertical Images Only // This is no secret, but Pinterest gives high favor to the pins that are vertical. Pins that are horizontal and even square are naturally drowned out by vertical pins in your Pinterest feed. So, if you’ve been creating horizontal pins, stop! Start working on vertical images for your posts. Canva is one of the best tools ever for bloggers, and they have the perfect Pinterest pin size readily available for you! Vertical images only!
So, have you maxed out your Pinterest profile for success? What has proven to be one of the best things you’ve done for your Pinterest profile? Is there anything you still need to do? Let’s chat all about Pinterest!
Let’s connect! >> Facebook | Instagram | Twitter | Pinterest

